EseeCloud for Windows — CMS Download & Setup Tutorial
eseecloud offers a dedicated PC client for Windows called EseeCloud CMS (Camera Monitoring System). Unlike the mobile app, the CMS lets you monitor multiple cameras simultaneously on a large screen, manage recordings, and control PTZ cameras — all from your Windows 10 or Windows 11 desktop.
This guide covers everything: where to download the CMS, how to install it step by step, how to add your first camera, and how to fix the most common Windows errors.
What Is EseeCloud CMS?
EseeCloud CMS is the official Windows client for eseecloud. It connects to the same cameras and account as the mobile app, but is designed for desktop use. Key capabilities include:
- Multi-screen monitoring — view up to 49 camera channels at once in split-screen layouts
- Video playback & download — search, review, and export recorded footage from SD cards
- Remote device management — rename cameras, adjust video quality, configure motion detection
- PTZ control — pan, tilt, zoom, and set preset positions for PTZ cameras
- Works with your existing account — log in with the same cloud account you use on your phone
CMS supports DVR, NVR, IP cameras, VR CAM, and wireless NVR kits — any device already working in the eseecloud mobile app.
Download EseeCloud CMS for Windows
Download EseeCloud CMS V3.0.8.4 for Windows →
| Detail | Value |
|---|---|
| File | EseeCloud_Setup_3.0.8.4.exe |
| Version | V3.0.8.4 (latest) |
| Supported OS | Windows 7 / 8 / 10 / 11 (32-bit & 64-bit) |
Looking for the mobile app instead? Visit the download page for Android and iOS links.
System Requirements
Before installing, confirm your PC meets these requirements:
| Component | Minimum Requirement |
|---|---|
| Operating System | Windows 7 / 8 / 10 / 11 (32-bit or 64-bit) |
| CPU | Intel Core i3 / 2.4 GHz or faster |
| RAM | 4 GB or more |
| Graphics | Intel HD 4000+ (integrated) or NVIDIA GeForce GTX 460+ (dedicated) |
| Network | Internet connection required for cloud login and remote camera access |
Note: Viewing many high-resolution channels simultaneously requires a faster CPU and more RAM. If you plan to monitor 10+ cameras at once, 8 GB RAM or more is recommended.
Transform the Real World into Minecraft
Turn your hometown, favorite city, school, landmark, or travel destination into a playable Minecraft world. Pick a place on the map and generate online in minutes.
Try Arnis NowStep-by-Step Installation Guide
Step 1 — Run the Installer
Double-click the downloaded EseeCloud_Setup_3.0.8.4.exe file. If Windows prompts "Do you want to allow this app to make changes?", click Yes.
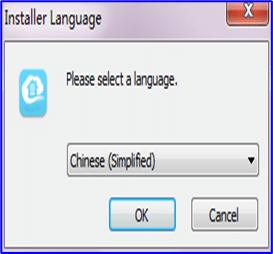
Step 2 — Select Display Language
Choose your preferred display language from the dropdown. English is selected by default.
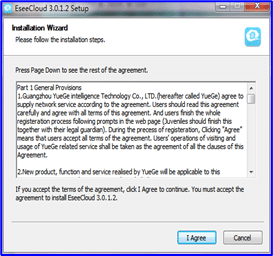
Step 3 — Accept the License Agreement
Read the software agreement and click I Agree to continue.
Step 4 — Choose Installation Path
Select where to install CMS. The default path (C:\Program Files\EseeCloud) works for most users.
Important: Avoid choosing a folder path that contains Chinese characters — this can cause the plugin to fail to load after installation.
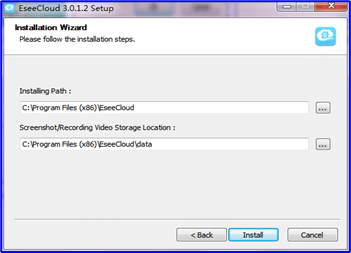
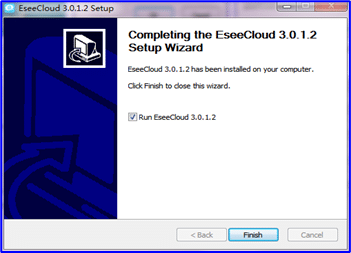
Step 5 — Complete Installation
Click Install and wait for the process to finish. Once complete, you can check "Run EseeCloud CMS" to launch it immediately.
Logging In to EseeCloud CMS
CMS offers two login modes:
Cloud Login (Recommended)
Use the same account you created in the eseecloud mobile app. Your cameras and settings will sync automatically.
- Click Cloud Login on the login screen
- Enter your registered email/username and password
- Click Login
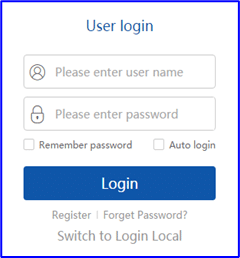
Local Login
For local network access without an internet account:
- Default username:
admin - Default password: (leave blank)
Security tip: Change the default blank password immediately after your first local login to prevent unauthorized access to your cameras.
Adding Your Camera to CMS
Once logged in, you need to add your camera to the device list. CMS supports three methods:
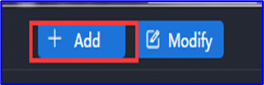
Method 1 — LAN Auto-Search (Easiest)
If your camera is on the same local network as your PC:
- Go to Device Management
- Click Refresh LAN Device — CMS will automatically scan and list nearby cameras
- Select your camera and click Add

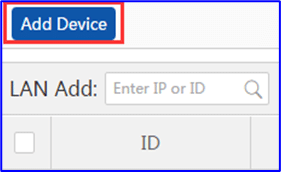
Method 2 — Cloud ID (Remote Access)
To add a camera you've already set up via the mobile app:
- Open the mobile app → go to the camera's Device Info to find the Cloud ID
- In CMS, go to Device Management → Add Device
- Select Cloud ID mode, enter the Cloud ID and channel number
- Confirm the device type and click OK
Method 3 — IP/DDNS
For cameras with a static IP or DDNS address:
- In Device Management, select IP/DDNS mode
- Enter the device IP, port, and channel number
- Click OK
Viewing Live Camera Feeds
After adding your camera, start a live view:
- Tree list style: Double-click any device/channel to connect
- Graphic list style: Click the play button next to the device
CMS supports up to 49 split screens — select your preferred layout from the bottom toolbar (1, 4, 9, 16, 25, or 49 channels).

Common Windows Errors & Fixes
Fix: "mfc100u.dll is missing"
What this means: EseeCloud CMS requires the Microsoft Visual C++ 2010 runtime library, which includes mfc100u.dll. This file is often absent on fresh Windows installs.
Solution:
- Open Start → search for
appwiz.cpl→ press Enter - Check if "Microsoft Visual C++ 2010 Redistributable" is listed
- If not (or if it's listed but corrupted), download and install both versions:
- Install both even if your Windows is 64-bit — EseeCloud CMS uses 32-bit components
- Restart your PC and relaunch CMS
Fix: "0xc000007b — The application was unable to start correctly"
What this means: This error indicates a conflict between 32-bit and 64-bit runtime libraries — usually caused by missing or mismatched Visual C++ Redistributable packages.
Solution (try in order):
- Run as Administrator: Right-click the CMS shortcut → Run as administrator
- Reinstall all Visual C++ Redistributables: Install the x86 and x64 versions of Visual C++ 2008, 2010, 2013, and 2015–2022 (from oldest to newest)
- Repair system files:
- Open Command Prompt as Administrator
- Run:
DISM /Online /Cleanup-Image /RestoreHealth - Then run:
sfc /scannow - Restart your PC
- Reinstall CMS: Uninstall EseeCloud CMS from Settings → Apps, then reinstall the latest version
Fix: "Cannot load plugin" on Startup
What this means: The CMS plugin failed to load — almost always caused by the installation path containing Chinese characters.
Solution:
- Uninstall EseeCloud CMS
- Reinstall it to a path that contains only English characters (e.g.,
C:\EseeCloudor the default path)
Fix: Black Screen / Video Not Loading
If you see a black screen after connecting a camera:
- Check bandwidth: Too many cameras or a slow connection can cause this. Try reducing the video quality (SD instead of HD)
- Update graphics drivers: Outdated GPU drivers can interfere with video rendering
- Reduce connected channels: Start with one camera, then add more gradually
Windows 11 Notes
EseeCloud CMS installs and runs on Windows 11, but keep these points in mind:
- Install as Administrator: On Windows 11, right-click the installer and select Run as administrator to avoid permission-related installation failures
- Compatibility mode: If CMS crashes or behaves unexpectedly after a Windows 11 update, try setting it to run in compatibility mode for Windows 10:
- Right-click the CMS shortcut → Properties
- Go to the Compatibility tab
- Check "Run this program in compatibility mode for Windows 10"
- Click Apply
- Antivirus/firewall: Windows Defender or third-party antivirus software may block CMS's network access. Add CMS to the allow-list if cameras fail to connect
CMS Features at a Glance
| Feature | Details |
|---|---|
| Live view | Up to 49 split-screen channels |
| Video playback | Search by date, time, and recording type |
| Video download | Batch download or select individual clips |
| PTZ control | Pan, tilt, zoom, focus, and presets |
| Motion detection | Configure sensitivity and alert types per camera |
| Remote settings | Adjust camera settings without touching the device |
| User management | Create sub-accounts with restricted permissions |
| TF card management | View SD card status and format remotely |
| Multi-language | Supports English, Chinese, and other languages |
Frequently Asked Questions
Is EseeCloud CMS free to download?
Yes. CMS is free to download and use. A cloud account (also free) is required for remote access and cloud storage features. Local LAN viewing works without any account.
Can I use EseeCloud CMS on Windows 11?
Yes. CMS supports Windows 7, 8, 10, and 11 in both 32-bit and 64-bit. See the Windows 11 notes above if you encounter issues.
Do I need to install CMS if I already have the mobile app?
No — the mobile app is standalone. CMS is optional, designed for users who want to monitor cameras on a larger PC screen, manage multiple cameras, or download recordings.
Can I use the same account in both CMS and the mobile app?
Yes. Log in with your cloud account in both — your cameras and recordings sync automatically.
CMS won't connect to my camera — what should I check?
First verify the camera is online in the mobile app. If it's online there but not in CMS, ensure your firewall isn't blocking CMS. Also try adding the camera by Cloud ID instead of LAN search. For deeper troubleshooting, see the Troubleshooting Guide.
Where are my screenshots and recordings saved?
By default: screenshots go to the snapshot folder, recordings to the record folder, and downloaded videos to the video_download folder — all inside the CMS installation directory. You can change these paths in Settings → Basic Settings → Path Modification.
Transform the Real World into Minecraft
Turn your hometown, favorite city, school, landmark, or travel destination into a playable Minecraft world. Pick a place on the map and generate online in minutes.
Try Arnis NowNext Steps
- Set up a camera for the first time? → Camera Setup Guide
- Having connection issues? → Troubleshooting Guide
- Need the mobile app download? → Download Page
- Questions about cloud storage costs? → Pricing Page