How to Share an EseeCloud Camera & Manage Multiple Users
Whether you want your spouse to monitor the front door or your parents to check the nursery cam, eseecloud makes it straightforward to share cameras with other phones. This guide also covers how to delete recordings and events, manage shared devices, and understand what the Cloud ID is.
How to Share Your EseeCloud Camera with Another Phone
Sharing in eseecloud is done through a Share QR Code generated inside the app. The person you want to share with needs the eseecloud app installed on their phone — they do not need an account with access to the original camera.
Step 1 — Open the Share option for your camera
- Open the eseecloud app and go to the Device List.
- Find the camera you want to share. On the device card, tap the Share button (the share icon visible in the action row beneath the camera thumbnail).
- The app generates a Share QR Code unique to that camera.
Step 2 — Send the QR code to the recipient
- You can take a screenshot of the share QR code and send it via text, WhatsApp, email, or any messaging app.
- Alternatively, show the QR code on your screen directly if the recipient is nearby.
Important: The share QR code contains the camera's connection information. Keep it private — anyone who scans it can access your camera feed.
Step 3 — Recipient scans the share QR code
The person receiving access needs to:
- Open the eseecloud app on their phone (download link: Android · iOS).
- Log in or use Local Experience mode.
- Tap the "+" button on the Device List screen to open the QR code scanner.
- Scan the share QR code you sent them.
- The app shows a search result — tap Add to confirm.
- The shared camera now appears in their device list.
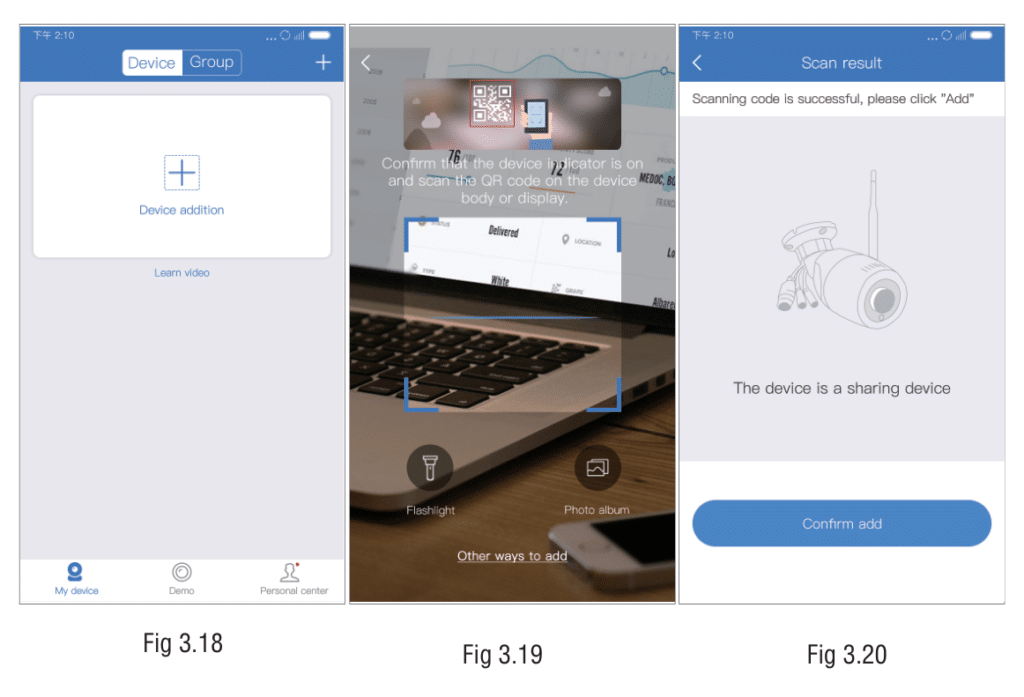
Note: The recipient does not need to enter a device password — access is granted through the share QR code itself.
What Can a Shared User Do?
Understanding share permissions prevents confusion about what family members can and cannot control.
| Feature | Owner | Shared User |
|---|---|---|
| Live view / real-time preview | ✅ | ✅ |
| Playback (SD card / cloud) | ✅ | ✅ |
| Receive motion alerts & push notifications | ✅ | ✅ |
| PTZ control (pan/tilt/zoom) | ✅ | ✅ |
| Take screenshots in app | ✅ | ✅ |
| Change camera settings (WiFi, password, motion detection) | ✅ | ❌ |
| Format SD card | ✅ | ❌ |
| Delete the camera from the system | ✅ | ❌ (can only remove from their own device list) |
| Share the camera with additional users | ✅ | ❌ |
Summary: Shared users get full viewing and alert access but cannot change settings or share the camera further. The owner retains full administrative control.
Best Practices for Family Camera Management
Managing multiple household members across your eseecloud system is easy when you follow a few simple rules:
1. One owner account per camera system
Keep one primary account as the "owner" — the account that originally added all cameras. Share individual cameras from that account to family members' phones. This ensures a single point of control.
2. Use a strong device password
When you initially set up your camera, set a unique device password (not the default). The device password is separate from your app account password. Without the share QR code, others cannot access your cameras even if they know the Cloud ID.
3. Revoke access when needed
If a family member gets a new phone or you need to remove their access, use the Personal Center → Settings to manage who has access. See the Managing Shared Devices section below.
4. One camera, multiple viewers
eseecloud allows multiple users to view the same camera simultaneously. Unlike some systems, you do not pay extra per viewer — share with as many family members as needed.
5. Enable push notifications on each phone
Shared users receive motion alerts only if notifications are enabled on their specific phone. Remind family members to allow eseecloud notification permissions in their phone settings.
Managing Shared Devices — Revoking Access
To remove a shared user (owner action)
If you need to revoke someone's access to your camera:
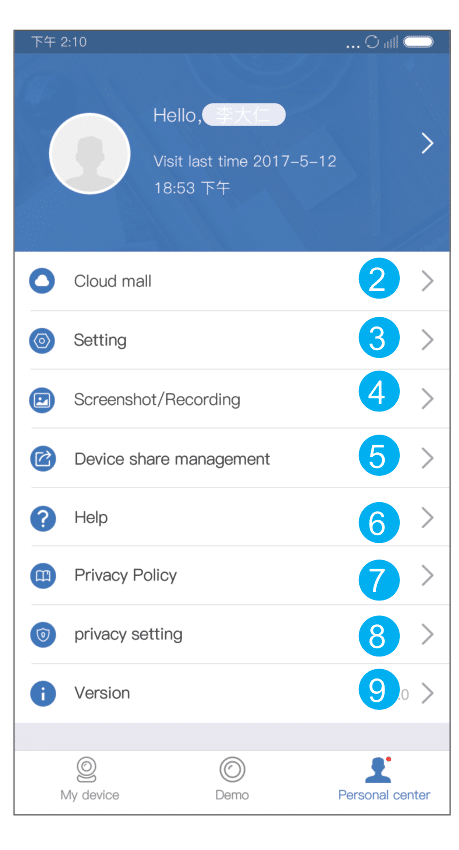
- Open the eseecloud app and tap the Personal Center icon (bottom-right of the main screen).
- Go to Settings.
- Find Device Share Management (or "Manage Shared Devices").
- You will see a list of devices you have shared and the users who have access.
- Select the user or device share entry you want to remove and tap Delete or Remove.
After removal, that user's app will no longer display the shared camera.
To remove a shared camera from your own list (recipient action)
If you received a shared camera and no longer want it on your device list:
- Long-press the camera card in the Device List, or tap the Settings icon on the camera card.
- Select Remove Device or Delete.
- This removes the camera from your device list only — it does not affect the owner's camera or other shared users.
How to Delete Recordings and Events
eseecloud stores recordings in two places: locally on an SD card inside the camera, and in the cloud if you have an active cloud storage subscription. Deletion works differently for each.
⚠️ Warning — Deletion is permanent and irreversible.
Deleted cloud recordings and events cannot be recovered. For SD card recordings, once a file is deleted it is gone. Before deleting, confirm you no longer need the footage.
Deleting SD Card Recordings
SD card recordings are managed through the device settings:
- Open the eseecloud app and go to your Device List.
- Tap the Settings (gear) icon on the camera whose recordings you want to manage.
- Go to Device Storage.
- Here you can see the TF/SD card status, used and available capacity.
- To delete all recordings, tap Format — this erases the entire SD card and resets it for new recordings.
Note: The eseecloud app does not support deleting individual SD card clips directly from the phone. Format deletes all recordings at once. If you need to delete specific clips, remove the SD card, connect it to a computer, and delete files manually.
Deleting Cloud Events and Recordings
Cloud events are motion-triggered clips stored in the cloud. To delete them:
- Open the eseecloud app.
- Navigate to the Events or Alarm Messages section (accessible from the device card or the bottom navigation bar).
- Select the event(s) you want to delete. Most versions support selecting multiple events at once.
- Tap Delete and confirm.
⚠️ Cloud recordings are permanently deleted and cannot be restored. Deleting events also removes the cloud video clip associated with that event.
If you cannot find the delete option, check that you are the device owner — shared users may not have permission to delete cloud events depending on your app version.
Need cloud storage? See the EseeCloud Pricing Guide for cloud subscription options.
Understanding Loop Recording — Why Old Footage Disappears Automatically
If you use an SD card for continuous recording, you may notice that old footage is automatically overwritten. This is called loop recording (also called continuous loop or circular recording).
How loop recording works:
- When the SD card fills up, the camera automatically deletes the oldest recordings to make room for new footage.
- This happens silently in the background — no notification is sent.
- The camera never stops recording due to a full card.
What this means for you:
- On a 64 GB SD card with HD recording, you typically get 3–7 days of footage before overwriting begins.
- If you need to keep specific footage permanently, download the clip to your phone before it gets overwritten.
- Increasing your SD card size (up to 128 GB, Class 4+, FAT32 format) extends how long recordings are kept.
- Cloud storage does not use loop recording — clips are stored separately until you manually delete them or your subscription expires.
For help with SD card setup or troubleshooting, see the Camera Setup Guide.
What Is the EseeCloud Cloud ID?
Cloud ID (also written as Device ID) is the unique identifier that connects your physical camera to the eseecloud network. Think of it as your camera's phone number on the P2P (peer-to-peer) internet connection system.
Where to find your camera's Cloud ID
- Open the eseecloud app and go to your Device List.
- Tap the Settings icon on the camera card.
- Select Device Info.
- The Device ID (Cloud ID) is displayed here — it is typically a 16-character alphanumeric code.
You can also find the Cloud ID on a sticker on the camera body itself, or on the QR code label (the ID is usually printed below the QR code).
When do you need the Cloud ID?
| Situation | Why you need the Cloud ID |
|---|---|
| Adding the camera manually (no QR scan) | Enter the ID manually in the "Other Ways to Add" flow |
| Re-adding a camera after a factory reset | The ID stays the same even after a reset |
| Adding a networked camera or NVR Kit | Required for manual ID entry during setup |
| Contacting support | Support may ask for the Cloud ID to identify your device |
The Cloud ID does not change — even if you factory-reset the camera or change your router. It is permanently associated with the camera hardware.
Frequently Asked Questions
Can I share the camera with someone who doesn't have an EseeCloud account?
The recipient needs the eseecloud app installed, but they can use it in Local Experience mode without creating an account. However, using an account is recommended so their shared devices are saved and not lost if they clear app data.
How many people can I share one camera with?
There is no documented limit on the number of users you can share a camera with. Multiple family members can all view the same camera simultaneously.
Does the shared user see my account information?
No. The shared user only sees the camera feed and related settings they have permission to access. Your personal account details remain private.
Will the shared user be notified if I revoke access?
No automatic notification is sent. The camera will simply disappear from their device list.
Can I share a camera I received (as a shared user)?
No. Only the original device owner can generate share QR codes and grant access to other users.
My share QR code expired — what do I do?
Generate a new share QR code from the camera's Share button. Share codes may have a limited validity window.
I deleted events by mistake — can I recover them?
Unfortunately, no. Deleted cloud events and recordings are permanently removed and cannot be recovered. Always double-check before deleting cloud footage.
Related Guides
- EseeCloud Camera Setup Guide — adding and configuring your camera for the first time
- EseeCloud Login & Account Guide — account registration and access
- EseeCloud Pricing — Cloud Storage Plans — cloud recording subscription options
- EseeCloud Troubleshooting Guide — fix camera offline, app, and recording issues
- Download EseeCloud — get the app for Android, iOS, Windows, or Mac